
Istio does not expose a dedicated CRD, like virtual services and destination rules, to configure a rate limiter. But DevOps can use Istio to change Envoy proxy configurations and then set up rate limiting.
Here, I will show you how to enable Istio local rate limiting using Envoy filters. Before that, let us see what rate limiting is and the types of Istio rate limiting.
What is rate limiting
Rate limiting is a mechanism to prevent services from being overwhelmed with requests. A rate limiter sets the maximum number of requests a service can receive in a given period and rejects requests exceeding the limit.
For example, you can see below that the payment service’s rate limiter is set to a maximum of 10 requests in 60 seconds/per minute. Further requests receive HTTP 400: Bad Request status code.

DevOps teams implement rate limiting on critical services, such as login or payment. It helps to prevent malicious activities like DoS and brute force, which ensures service availability at all times.
Istio rate limiting
There are two types of Istio rate limiting: local and global.
- Istio local rate limiting: Helps to configure rate limiter on a per pod/Envoy proxy basis. Istio pilot generates EnvoyFilter resource, which DevOps can use to make changes directly to Envoy configurations to add a local rate limiter filter.
- Istio global rate limiting: Helps to configure rate limiter across pods in the mesh. It needs a central rate-limiting service connected to Envoy proxies across the mesh, which will then count the requests and take rate-limiting decisions. Check the blog, How to Configure Istio Global Rate Limiting, to learn more about it and to see how to set Istio rate limiting per IP.
Configuring Istio local rate limiting using Envoy filter
Let us briefly look into the token bucket algorithm and see how to set up Istio local rate limiting using Envoy filter.
Overview: Token bucket algorithm
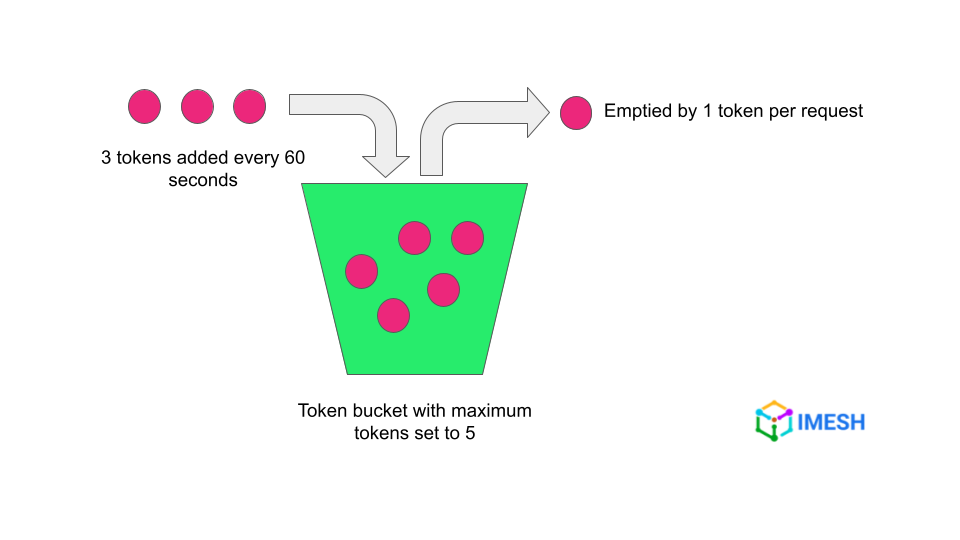
Envoy proxy allows rate limiters to be set using the token bucket algorithm. It means that you can define the number of maximum tokens in the bucket i.e., the number of maximum requests the service can receive in a given time.
Each request will consume a token. You can set the time for the bucket to be refilled and also the number of tokens to be refilled. If all tokens are consumed, further requests will be rejected until the tokens are refilled.
For example, the token bucket in the below image means that only 5 requests can be sent to the service in the first 60 seconds. Then the client will have to wait for 60 seconds to complete to be able to send another 3 successful requests.
Prerequisites
- I am using Istio 1.16.7 on AKS.
- I have two stateful services — httpbin and sleep — deployed in an Istio-enabled namespace, rl.
- Both services have one pod each, with Evoy proxy sidecars injected into them.
- All resources used for the demo are in the IMESH git repo folder.
Steps to enable Istio local rate limiting
Follow the steps to set up a local rate limiter on httpbin pod:
- Step #1: Apply EnvoyFilter CRD
- Step #2: Verify rate limiter
- Step #3: Header-based rate limiting with descriptors and actions
Step #1: Apply EnvoyFilter CRD
Rate limiting can be applied on both source or destination pods. I’m applying the following EnvoyFilter CRD on the destination pod, which is httpbin.
You can see the whole EnvoyFilter CRD here: httpbin-ratelimit-simple.yaml.
Let me break down what each part of the EnvoyFilter resource means because it is vital to know what you are doing while making changes there.
- workloadSelector: Here we mention the pod where we need to set up the rate limiter. Otherwise, the filter will apply to all pods in the namespace.
I selected the destination pod, httpbin in rl namespace, to which the EnvoyFilter will be applied.
kind: EnvoyFilter
metadata:
  name: httpbin-ratelimit
  namespace: rl
spec:
  workloadSelector:
    labels:
app: httpbin- configPatches: It describes the patch configurations, i.e., the rate limiter configuration, we apply.
Here we apply the patch to the HTTP_FILTER value and specify it should be applied on inbound requests to the httpbin sidecar, by setting context: SIDECAR_INBOUND.
configPatches:
    - applyTo: HTTP_FILTER
      match:
context: SIDECAR_INBOUND- listener: Listeners are bound to a specific port and IP address and they receive requests. Envoy proxy can have multiple listeners and each listener has filter chains attached to it.
Filter chains can manipulate requests as they go through them. We select the http_connection_manager (HCM) filter out of the filter chain to add the patch, i.e., rate limiter rules.
 listener:
          filterChain:
            filter:
name: "envoy.filters.network.http_connection_manager"- patch: This is where we define the token bucket rate limiting algorithm.
We set operation: INSERT_BEFORE, which specifies that the following rate limiter configuration gets applied first, at the top of the HTTP filter list, since the order of elements matters for filters.
patch:
        operation: INSERT_BEFORE
        value:
          name: envoy.filters.http.local_ratelimit
We use the extension, envoy.filters.http.local_ratelimit, to extend envoy.filters.http and set rate limiter configurations using the fields provided by the extension.
Note: Look at Istio’s envoy version relationship table and be careful about the version of Envoy docs you are referring to.
- typed_config: It specifies the configuration for the rate limiter filter, and type_url defines the structure of the configuration.
typed_config:
            "@type": type.googleapis.com/udpa.type.v1.TypedStruct
type_url: type.googleapis.com/envoy.extensions.filters.http.local_ratelimit.v3.LocalRateLimit- stat_prefix: The field is for the likes of Prometheus and Grafana to scrape metrics.
 value:
stat_prefix: http_local_rate_limiter- token_bucket: Here we define the maximum number of tokens allowed, the time to refill the tokens, and the number of tokens to be refilled.
The configuration specifies a maximum of 10 requests to go through and wait for a minute, before the clients can make 5 more requests. When there are no tokens left, the request will be rate-limited and receive the response status code (which is BadRequest (HTTP 400) here).
token_bucket:
                max_tokens: 10
                tokens_per_fill: 5
fill_interval: 60s- filter_enabled, filter_enforced: They specify the percentage of requests on which rate limiter should be enabled and enforced, respectively.
The numerator and denominator values define the percentage, and the request is rate-limited only if it falls into the enforced percentage of requests.
filter_enabled:
                runtime_key: local_rate_limit_enabled
                default_value:
                  numerator: 100
                  denominator: HUNDRED
              filter_enforced:
                runtime_key: local_rate_limit_enforced
                default_value:
                  numerator: 100
denominator: HUNDRED- response_headers_to_add: Here we can define the response headers when a request is rate-limited. Along with the status code, an additional header of x-rate-limited: TOO_MANY_REQUESTS is added.
response_headers_to_add:
                - append_action: APPEND_IF_EXISTS_OR_ADD
                  header:
                    key: x-rate-limited
                    value: TOO_MANY_REQUESTS
              status:
                code: BadRequest
Now let us apply the rate limiter yaml in the Istio-enabled, rl namespace:
kubectl apply -f basic/httpbin-ratelimit-simple.yaml -n rlKeep in mind that this rate limiter will be applied to all httpbin pods. Each pod will have the token bucket defined in the configuration.
Step #2: Verify rate limiter
To verify if the rate limiter is working, I will exec into the sleep pod and then curl httpbin pod:
kubectl exec -it sleep-0 -n rl -- sh
curl v "http://httpbin:8080/get"
After a few successful requests (200 OK), the rate limiter kicked in and I got 400 Bad Request response as shown below:
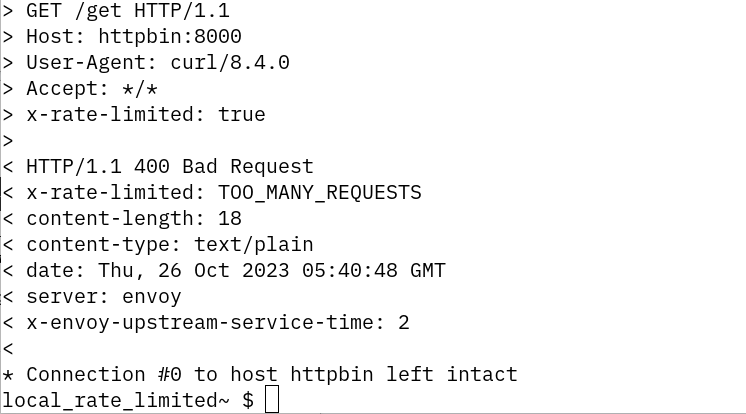
Once the above response is received, we will have to wait for a minute for the token bucket to be refilled. Then we can make 5 more successful requests in the next minute, as defined in the local rate limiter config.

Step #3: Header-based rate limiting with descriptors and actions
The above rate limiter configuration counts every request to the httpbin pod and applies the rate limiter whenever it crosses 10 requests, initially.
What if you want the rate limiter to count only requests with a certain header value? That is where we use descriptors and actions .
Check httpbin-ratelimit.yaml. I have added the following section towards the end of the configuration used in step #1:
descriptors:
      - entries:
        - key: "header-rate-limit"
          value: "true"
        token_bucket:
            max_tokens: 2
            tokens_per_fill: 1
            fill_interval: 60s
- applyTo: VIRTUAL_HOST
  match:
      context: SIDECAR_INBOUND
      routeConfiguration:
          vhost:
          name: "inbound|http|8000"
  patch:
      operation: MERGE
      value:
        rate_limits:
        - actions:
            - request_headers:
                  header_name: "x-rate-limit"
                  descriptor_key: "header-rate-limit"
Under the virtual host configuration for inbound requests on port 8000, we define that if the request header is x-rate-limit, it gets assigned to the header-rate-limit variable, which is called a descriptor. The descriptor will be attached to the request.
Under descriptors in the beginning, we define that if the request contains the header-rate-limit descriptor, apply the following configured token bucket (max_token: 2, token_per_refill: 1, fill_interval: 60s).
If the request does not have the said descriptor entry, the token bucket defined in step #1 will be applied.
You can verify header-based rate limiting by passing the header value into the curl request:
kubectl exec -it sleep-0 -n rl -- sh
curl -v "http://httpbin:8080/get" -H "x-rate-limit: true"
Only 2 requests will be allowed in this case (max_token: 2), and you will have to wait for a minute (fill_interval: 60s) to send another successful request (token_per_refill: 1).
DevOps teams can define rate-limiting actions on the following descriptors, other than header value (check here for more info):

Rate limiting at Istio ingress gateway
There is not much difference in the configuration we used above to set rate limiting at Istio Ingress Gateway.
The only changes are in the workloadSelector field and the context where the rate limiter patch gets applied to:
apiVersion: networking.istio.io/v1alpha3
kind: EnvoyFilter
metadata:
  name: ratelimit-ingressgateway
  namespace: istio-system
spec:
  workloadSelector:
    labels:
      istio: ingressgateway
  configPatches:
    - applyTo: HTTP_FILTER
      match:
        context: GATEWAY
In the above configuration, we change the workloadSelector to match the ingress gateway as the Istio Ingress Gateway is itself an Envoy proxy.
And since there is a difference in the configuration for sidecars and gateways, we also need to change the context to GATEWAY from SIDECAR_INBOUND.
The rest of the configuration remains and works the same as before.
Word of advice: be careful with Envoy filters
Be mindful about what you are doing with EnvoyFilter CRD. A slight mess-up in the configuration can destabilize the entire mesh.
For example, if you are not careful about where you are applying the rate limiter you may rate limit the connection to the control plane, i.e., Istiod.
It is also hard to troubleshoot such issues because there is no way to see for which connection the rate limiter got applied, apart from looking at the configuration again.
Other than that, the order of the EnvoyFilter resource matters (parsing happens from top-to-bottom). If you are new, it would take some playing around to get it — and even more to deploy the configuration in a production environment. And, although unlikely, changes will have to be made when there are modifications in EnvoyFilter CRD or the local rate limiter proto.
To get around these challenges, we provide managed Istio at IMESH. Our Istio experts help enterprises set up advanced Istio and Envoy features — such as rate limiters at service or ingress/egress gateway level — in production from day one. It helps DevOps teams and architects maintain a resilient and available infrastructure.
Feel free to check out the offer here: https://imesh.ai/managed-istio.html.