We have already covered an introduction to Istio ambient mesh and shown how ambient mesh is different from the default sidecar architecture.
Ambient mesh is a new, sidecar-less data plane mode for implementing Istio. It divides the L4 and L7 functionalities of Istio into 2 components — ztunnels and waypoint proxies, respectively.
Ztunnel is a light-weight, Rust agent that runs on each node (daemon). It takes care of encrypting traffic using mTLS and provides TCP metrics and L4 authorization.
Waypoint proxies are Envoy proxies that can be deployed for services requiring advanced L7 telemetry, authorization, and network management (canary deployment, circuit breaking, retries, timeout, failover, etc.).
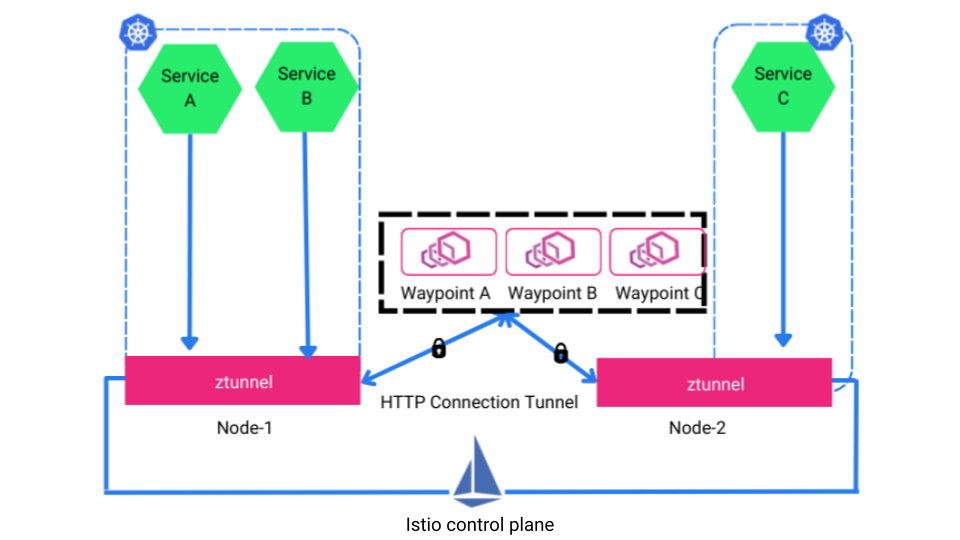
Istio ambient mesh architecture
Here, we will see how to install Istio ambient mesh, implement L4 authorization, and introduce waypoint proxies for L7 processing, on AWS EKS. (Note that ambient mesh is not ready for production rollout for now.)
Steps to install Istio ambient mesh on EKS
I’m using Istio v1.19.3 and following the below steps:
- Step #1: Install Istio ambient mesh
- Step #2: Deploy services, ingress gateway, and virtualService
- Step #3: Onboard services to ambient mesh
- Step #4: Implement L4 authorization using ztunnel
- Step #5: Introduce waypoint proxy for L7 authorization
You can see all the configurations on the IMESH GitHub folder.
If you would like to watch the steps in action, check out the following video:
Step #1: Install Istio ambient mesh
To install Istio ambient mesh, we need to set the profile to ambient. Otherwise, it will install the default Istio with sidecars.
Additionally, DevOps and architects can install Gateway API or classic ingress by adding it to the ambient mesh installation command. I’m using the classic Istio ingress here:
istioctl install --set profile=ambient --set "components.ingressGateways[0].enabled=true" --set "components.ingressGateways[0].name=istio-ingressgateway" It will install Istio core, Istiod, CNI, Ztunnel, and an ingress gateway, in istio-system namespace. You can have multiple gateways by modifying ingressGateways[0] in the command.
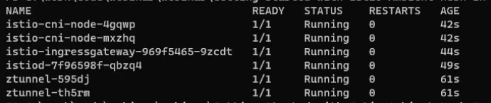
Now, check the pods in istio-system to verify the deployments:
kubectl get pods -n istio-system -o wideNote that the number of Istio CNI and ztunnel pods will be corresponding to the number of nodes in your cluster, as they are daemon sets. I have 2 nodes in my EKS cluster, so 2 ztunnels and Istio CNI pods each:
Step #2: Deploy services, gateway, and VirtualService
There are 2 services: echoserver-service-1 (demo-deployment-1.yaml) and echoserver-service-2 (demo-deployment-2.yaml).
I’m creating a namespace called ambient and deploying the services in the namespace:
kubectl create ns ambient
kubectl apply -f .\demo-deployment-1.yaml
kubectl apply -f .\demo-deployment-2.yaml
Now, to make the services accessible from the outside of the cluster, I’m deploying the Istio ingress gateway (demo-gateway.yaml) and a VirtualService (demo-virtualservice.yaml):
kubectl apply -f .\demo-gateway.yaml
kubectl apply -f .\demo-virtualservice.yaml
The VirtualService is configured in a way that it will listen to /echo1 and /echo2 and route the traffic to echoserver-service-1 and echoserver-service-2, respectively.
Run the following command to get the IP/DNS name of the application to access it from the outside of the cluster:
kubectl get svc -n istio-systemIt will show the external IP of istio-ingressgateway:

You can now access the services from your browser using your_external_ip/echo1 and your_external_ip/echo2.
Step #3: Onboarding services to ambient mesh
Until now, I haven’t done any Istio-specific configurations. The requests are going from the ingress to services without being encrypted, because the services are not part of the ambient mesh, yet.
Because of that, no new entries will pop up in ztunnel logs even when I access the services from the browser. We can check ztunnel logs using the command:
kubectl log -f -l app=ztunnel -n istio-systemMaking services part of the Istio ambient mesh is fairly simple. Follow the command to label and onboard the namespace to ambient:
kubectl label ns ambient istio.io/dataplane-mode=ambientOne of the major benefits of Istio ambient mesh here is that the pods need not be restarted when they are being part of the mesh, unlike sidecars. In the sidecar architecture, pods require a restart when the sidecar container is being injected into it.
After labeling the namespace to ambient mode, you will see ztunnel logs showing new entries.
Step #4: Implement L4 authorization using ztunnel
We saw that both echoserver-service-1 and echoserver-service-2 are accessible from the outside through ingress.
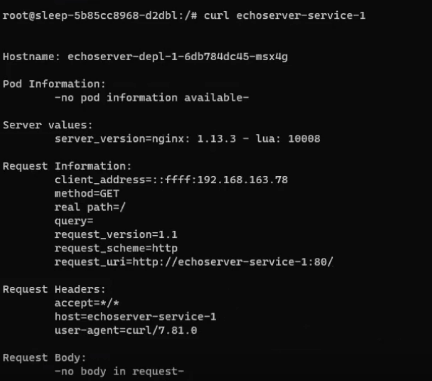
To check if the services are accessible from within the cluster, I’m deploying a sleep (sleep.yaml) service to the ambient namespace and doing a curl command to echoserver-service-1:
kubectl apply -f .\sleep.yaml
kubectl get pods -n ambient
kubectl exec -it your_sleep_pod_name -n ambient -- bash
# curl echoserver-service-1
The request is going through to echoserver-service-1:
The same happens for echoserver-service-2 as well.
Now, I’m limiting the access to echoserver-service-2 only from the ingress, i.e., from the browser. It means that the sleep service in the cluster cannot curl echoserver-service-2.
The L4 authorization using ztunnel can be done by deploying AuthorizationPolicy (demo-authorization-L4.yaml) resource:
kubectl apply -f .\demo-authorization-L4.yamlBoth echoserver-service-1 and echoserver-service-2 will now be available from the browser using external IP. But only echoserver-service-1 will be accessible if you curl both services from the sleep service.
You can verify it by running the commands:
kubectl exec -it your_sleep_pod_name -n ambient --bash
# curl echoserver-service-2
It will return the error status, “connection reset by peer.”
Step #5: Introduce waypoint proxy for L7 authorization
L7 authorization helps DevOps and architects granularly control the actions (GET, POST, PUT, DELETE) a service can perform while talking to another service.
Since L7 authorization requires parsing the HTTP headers of requests, it needs a waypoint proxy.
I’m deploying Gateway API CRD (gateway-api.yaml) before installing the waypoint proxy, since the waypoint proxy uses Gateway API:
kubectl apply -f .\gateway-api.yamlNow, run the following command to create a waypoint proxy for echoserver-serice-1 using its service account name, echo-service-account-1:
istioctl x waypoint apply --service-account echo-service-account-1 -n ambientYou can verify it by running the command:
kubectl get gtw -AIt will show the service name for which the waypoint is programmed and show the status as True:

Now, apply the AuthorizationPolicy resource (demo-authorization-L7.yaml):
kubectl apply -f .\demo-authorization-L7.yamlThe AuthorizationPolicy configures echoserver-service-1 to be accessible only from the sleep pod. And it allows only the GET method.
Trying other methods, like a HEAD method (curl -I echoserver-service-1), will receive a “403 Forbidden” response.
Also, the application will no longer be available from the browser, i.e., through the ingress. It will return “RBAC: access denied” status.
And that is the end of the tutorial.
Evaluate Istio ambient mesh for your non-prod environments
At IMESH, we support DevOps and architects to run Istio at scale without any of its operational complexities. Since Istio ambient mesh is nearing beta and safe for production rollout, we also provide dedicated POC on ambient mesh.
Talk to us to learn more about it. Check managed Istio if you need help with Istio in production.