Istio provides strong identities for workloads running in the mesh by default.
Istio control plane (istiod) and Istio agents (that run on each pod, within the Envoy proxy container) work together to sign, distribute, and rotate X.509 certificates to workloads (see Fig.A).
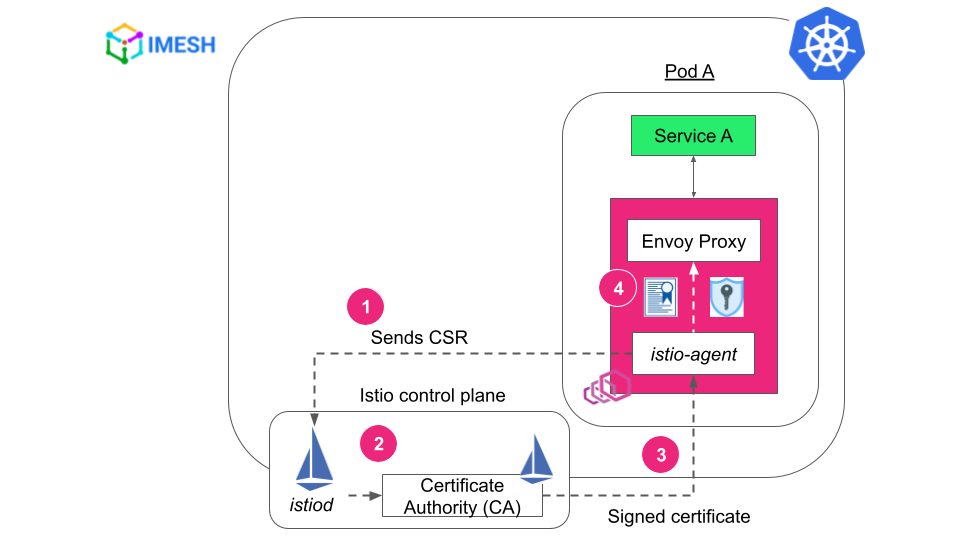
Fig. A – Istio certificate and identity mechanism
When Istio has such a robust certificate and identity mechanism, why should DevSecOps folks look into Istio-SPIRE integration?
Let us see why, and then I will show you a simple demo where two workloads authenticate each other using SPIFFE ID.
But before proceeding, please read the introduction to SPIFFE and SPIRE if you are new or would like to refresh your understanding: SPIFFE/SPIRE: An Introduction.
Why Istio-SPIRE makes sense for Kubernetes workloads
SPIRE is a production-ready implementation of SPIFFE standards that provide identity for workloads deployed in a heterogeneous environment. Using a dedicated identity mechanism like SPIRE with Istio gives the advantage of flexibility, scalability, and added granularity for in-depth defense.
- While Istio primarily uses attributes based on Kubernetes metadata, like namespace, service account, and labels, the scope of SPIRE’s workload authentication spans beyond them. Using SPIRE, DevSecOps can set granular identity based on the following attributes and more:
- Node characteristics – host machine, hardware
- Environment metadata – cloud provider, region, network configs
- Vendor-specific labels – instance type or instance ID in AWS
- SPIRE provides workload identity regardless of where the workload is deployed. It can easily and securely authenticate a VM workload to the services in the mesh by deploying Istio sidecar and SPIRE agent in the VM.
- SPIRE allows federation between trust domains. For example, let us say you have a few clusters with a different trustDomain value per cluster. When you want to securely authenticate workloads from clusters with different trustDomain values, Istio root CA might fail to issue certs. Here DevSecOps can use Istio-SPIRE, as SPIRE can establish trust and federate communication between trust domains using trust bundles.
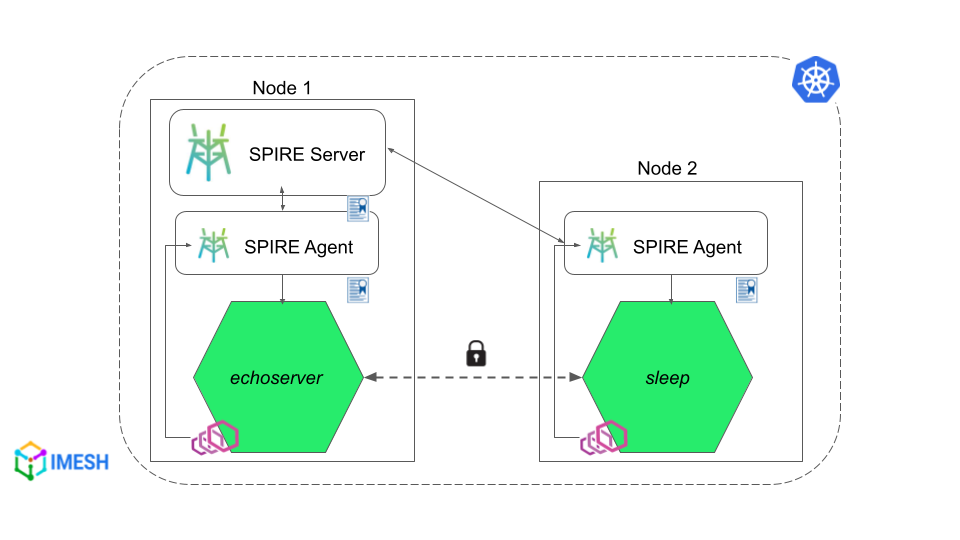
When you have SPIRE agents and server running in the mesh, this is how the certificate and private key distribution flow would look like:

Istio-SPIRE certificate and private key distribution flow
Note that the SPIRE agent runs on each node as a daemon. The SPIRE server can be in the same node or a different one, or in a different cluster altogether.
Now let us see how to implement SPIRE with Istio and use SPIRE control manager to issue identities for workloads in the mesh.
Istio-SPIRE: Prerequisites
There are two ways to register workloads in a SPIRE server: manual and automatic.
I’m using the automatic method where I deploy the SPIRE control manager along with the SPIRE server, which automatically registers new entries for each new pod that matches the selector defined in a ClusterSPIFFEID custom resource.
I’m using a single cluster, 2-node setup locally, with a service deployed in each node. This is how it would look like in the end:
To carry out this demo, all you need are Istioctl and Kubectl command-line tools. You can see the YAMLs used for the demo here.
Steps to integrate SPIRE with Istio
- Step #1: Install SPIRE to Kubernetes
- Step #2: Apply ClusterSPIFFEID to generate certificates for workloads
- Step #3: Install custom Istio
- Step #4: Deploy workloads into Istio-enabled namespace
- Step #5: Initiate communication between pods
Before you begin, make sure that Istio is not installed in your cluster. The SPIRE server has to be deployed in the cluster before Istio so that the Istio ingress gateway can get its certificate from the SPIRE server. Check step #3 for more details.
Watch the following video to see the demo in action:
Step #1: Install SPIRE to Kubernetes
Apply spire-quickstart.yaml to install SPIRE. The configuration has everything you need to install SPIRE. It includes definitions for the namespace, SPIRE server and agent, cluster role configurations, webhooks to validate the cluster, and the SPIRE control manager.
The configuration comes by default with Istio and you can find it at /istio-(your_version)/samples/security/spire. Apply it to install SPIRE in your cluster:
kubectl apply -f spire-quickstart.yamlAs mentioned above, I’m using a 2-node setup locally. That means a SPIRE agent on each node and a SPIRE server they talk to. You can see the deployments in spire namespace using the following command:
kubectl get all -n spire
The SPIRE agent pods house spire-agent, spiffe-csi-driver, and node-driver-registrar containers, while the SPIRE server pod has spire-server and spire-control-manager in it.
Step #2: Apply ClusterSPIFFEID to generate certificates for workloads
Apply cluster-spiffe-id.yaml (given below) to generate certificates for workloads by the SPIRE control manager.
apiVersion: spire.spiffe.io/v1alpha1
kind: ClusterSPIFFEID
metadata:
  name: spiffe-id
spec:
  spiffeIDTemplate: "spiffe://{{ .TrustDomain }}/ns/{{ .PodMeta.Namespace }}/sa/{{ .PodSpec.ServiceAccountName }}"
  podSelector:
    matchLabels:
  spiffe.io/spire-managed-identity: "true"
In the yaml, we provide a match that whenever a pod comes with the label, spiffe.io/spire-managed-identity: “true”, the SPIRE control manager provides a SPIFFE ID for that workload. You can also set a custom spiffeIDTemplate. I’ve used the default one here. Apply the yaml:
kubectl apply -f cluster-spiffe-id.yamlStep #3: Install custom Istio
Since we want Istio Ingress Gateway to get certificates from the SPIRE control manager, we annotate ingressGateways in the custom-istio.yaml with the label — spiffe.io/spire-managed-identity: “true” — used in the above step. I’m using istioctl to deploy custom-istio.yaml:
istioctl install --skip-confirmation -f custom-istio.yamlTo verify if Istio Ingress Gateway is registered with SPIRE, exec into the SPIRE server container inside the SPIRE server pod and check the entries:
kubectl exec -t spire-server-d456d6b54-q9b5g -n spire -c spire-server -- ./bin/spire-server entry show
You can see the istio-ingressgateway-service-account entry in the SPIRE server and its SPIFFE ID.
Step #4: Deploy workloads into Istio-enabled namespace
I’m deploying two services, echoserver-service and sleep, into istio-injection enabled ns1 namespace. I have annotated both services with clusterSPIFFEID’s match label, as I did in step #3 so that the SPIRE control manager generates workload identity for them.
Also, I have annotated both the services with inject.istio.io/templates: “sidecar, spire” since they will need SPIFFE CSI driver volume to access the respective agent socket it is being deployed with. The SPIRE injection template is defined in custom-istio.yaml.
Note: SPIRE agent uses SPIFFE CSI driver to inject a Unix Domain Socket in the pods so that Envoy proxy can fetch identities from SPIRE. You can add volume to the CSI driver instead of annotating services. But annotating as I showed above is the easier way to get started.
Let us deploy workload.yaml that contains the above configurations:
kubectl apply -f workload.yaml
We can see that workloads are running fine. Now let us verify whether the workloads have received SPIFFE IDs like we verified Istio Ingress Gateway in step #3. Run:
kubectl exec -t spire-server-d456d6b54-q9b5g -n spire -c spire-server -- ./bin/spire-server entry show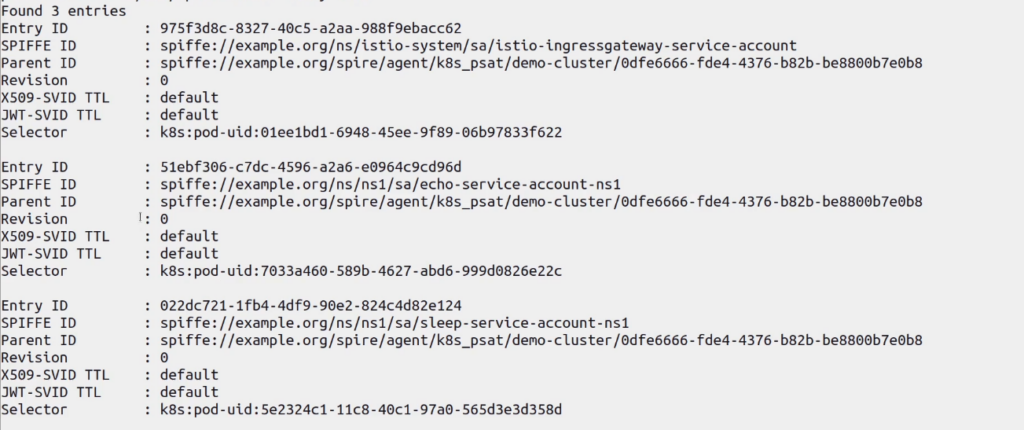
You can see there are three entries for Istio Ingress Gateway, Echo service, and Sleep service, respectively, in the SPIRE server registry.
Step #5: Initiate communication between pods and verify SPIRE authentication
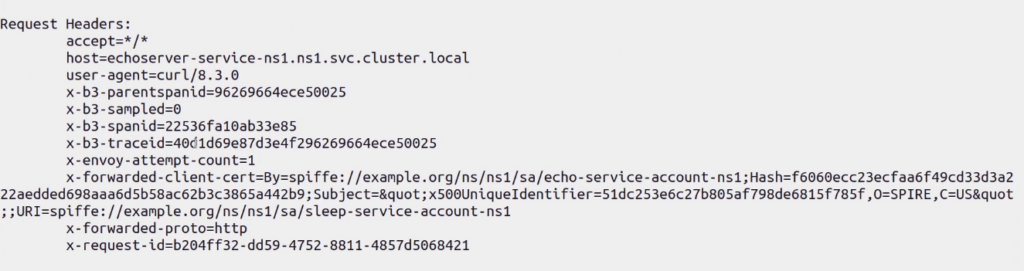
Use the following command to exec into the sleep pod and curl echoserver-service:
kubectl exec deploy/sleep-depl-ns1 -n ns1 -- curl -s http://echoserver-service-ns1.ns1.svc.cluster.localIf the connection is successful, among other information, it will return Envoy cluster details and the client certificate, which is a SPIFFE ID followed by a hash (see the image below).
Zero trust networks with Istio-SPIRE integration
SPIRE lays the foundation for zero trust networks by issuing and attesting identity for workloads. Istio-SPIRE integration makes SPIRE the identity provider for services running in the mesh. It gives flexibility for DevSecOps folks, allowing them to set identities based on granular attributes and federation of trust domains.
Try it out to see how it works. Talk to one of our Istio experts if you need help with configuring Istio-SPIRE enterprise-wide, or any help with Istio in general for that matter.