As Kubernetes networking grows more complex, platform teams are increasingly moving beyond default CNIs to gain better performance, security, and observability. Recent production outages caused by IP exhaustion, cross-AZ latency, and opaque networking behaviour in managed CNIs have pushed teams to evaluate Cilium as a next-generation Kubernetes networking and security solution.
In this blog, we walk through installing Cilium in standalone mode on AWS EKS using ENI IPAM and native routing. This setup is widely adopted for production EKS clusters where performance, scalability, and AWS-native networking are critical.
Video on Cilium Standalone on AWS EKS with ENI IPAM and Native Routing
In case you want to refer to the video, then here is my video (disclaimer: I have used AI-voice over to avoid MTI from my accent).
Recap of routing modes and IPAM
For a detailed idea, you can refer to our last blog on routing modes and IPAM. Let us recap quickly.
1. Routing Modes in Cilium
- Overlay Mode (VXLAN/Geneve): Simple setup, no underlay changes required.
- Native Routing (Direct Mode): No tunneling; relies on the underlay to route PodCIDRs.
- AWS ENI Datapath: Pods receive real VPC IPs; directly routable inside AWS.
2. IP Address Management (IPAM)
- Cluster Pool IPAM: Default mode; Operator manages PodCIDRs per node.
- AWS ENI IPAM: Pods get AWS VPC IPs; Operator handles IP allocation from AWS.
- Other IPAMs: Kubernetes, CRD-backed, Multi-pool (advanced).
Prerequisites and requirements
General requirements
Ensure correct kernel version, required IAM roles, supported instance types and proper VPC/Subnet configuration.
Disable Default AWS Add-ons
Disable AWS-node (AWS VPC CNI) and any other CNIs to avoid conflicts with Cilium.
Enable Private Networking
Add private Networking: true in the node group configuration.
Add Cilium Startup Taint
Use the taint node.cilium.io/agent-not-ready=true:NoExecute so application Pods only start after Cilium is ready.
Now, let’s go through the step-by-step installation process
Step-by-step installation of Cilium Standalone on EKS
1. Create the EKS Cluster
Create the EKS cluster using eksctl. This cluster configuration must avoid installing the default AWS VPC CNI.

2. Configure and Create Node Groups
- Apply the node group configuration with the following requirements- Private networking enabled
- Required IAM permissions for ENI management
- Cilium start-up taint to delay workload scheduling

Cilium start-up taint used
3. Apply Helm charts
First, add and update the Cilium Helm repository
Install Cilium with ENI IPAM and native routing enabled
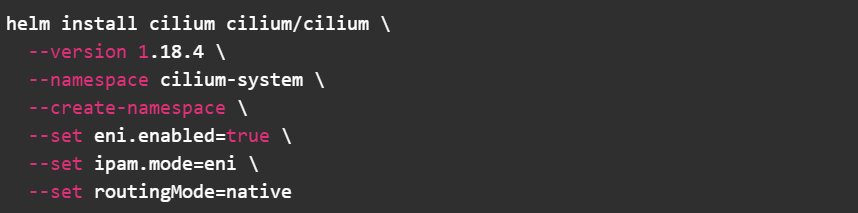 This configuration:
- Enables AWS ENI integration
- Assigns VPC IPs directly to Pods
- Disables overlay tunneling
4. Validate Networking
After all Cilium Pods are running, execute the built-in connectivity tests

A successful run confirms Pod-to-Pod, Pod-to-Service, and Node-to-Pod connectivity.
At this stage, you should observe-
- Cilium agents running on all nodes
- Pods receiving VPC-routable IP addresses
- No VXLAN or Geneve tunnels in use
This validates that native routing and ENI IPAM are functioning as expected.
Final thoughts
Running Cilium standalone on AWS EKS with ENI IPAM and native routing provides a clean, high-performance networking model aligned with AWS VPC design. This alternate, terminal-first guide offers the same production-ready outcome with a command presentation style that many engineers prefer for day-to-day operations. For teams moving beyond the default AWS VPC CNI, this approach is a strong foundation for scalable and observable Kubernetes networking.
In case you need help on adopting Cilium for your enterprise, you can reach out to our Cilium experts.